FAX852 Plus - Folder Faxing feature allows you to send faxes easily by putting fax jobs into designated folders (also known as “watched folders”) on your Windows file system.
Folder Faxing
Overview
Folder Faxing is a feature in FAX852 Plus which allows you to send faxes easily by putting fax jobs into designated folders (also known as “watched folders”) on your Windows file system. You can either simply put your fax job files into the folders manually or the process can be automated programmatically to better suit the needs of your business.
A typical fax job file contains parameters such as recipient’s fax number and the filename of the PDF document that needs to be faxed. The FAX852 Plus Service running in the background will periodically check those folders for new fax jobs and when found, converts them to faxes for delivery via the FAX852 Cloud Service automatically. You can monitor the status of your submitted fax jobs from within FAX852 Plus. Once a fax job has been processed, a result file will be automatically generated by default.
The following sections will provide you the details about:
How to Setup a Watched Folder in FAX852 Plus
In order to use the Folder Faxing feature, first of all you need to download and install FAX852 Plus onto your Windows computer. If you have not already installed it, please download the setup file for FAX852 Plus from the link below. Once downloaded, run the setup file and follow the on-screen instructions to complete the installation.
FAX852 Plus Setup File (version 1.2.0):
https://fax852.com/download/FAX852-Plus-1.2.0.msi
Once you have installed FAX852 Plus onto your computer, you can proceed to setup a new watched folder within FAX852 Plus, so that you can put your fax jobs into the corresponding folder on your file system when needed. The FAX852 Plus Service installed with FAX852 Plus will monitor the folder for new fax jobs for processing.
Steps for adding a new watched folder
- Click the Settings icon (i.e. gear icon) from the left menu panel of the Home screen.
- Click the Plus icon under the “Watched Folder Faxing” section of the Settings screen.
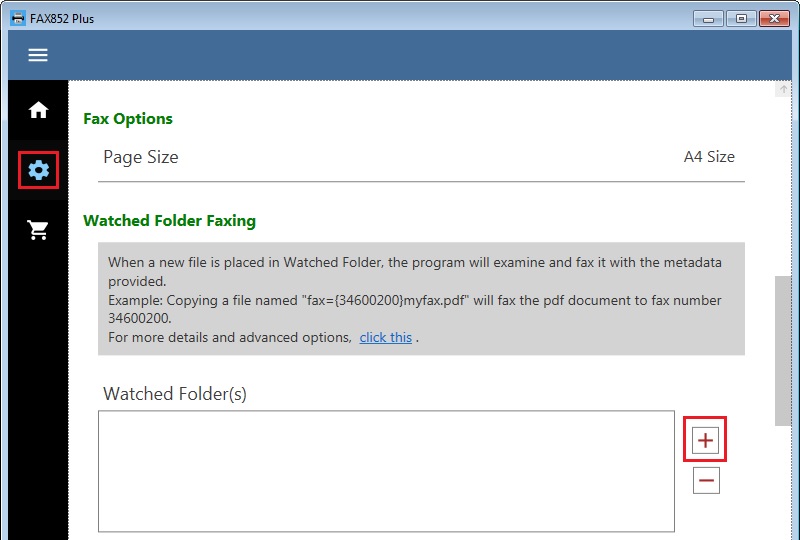
- Browse to choose a desired local folder (e.g. C:\MyFaxFolder) from the file system to be the new watched folder. Note that local root drives (e.g. C:\, D:\, E:\, etc.) and mapped network folders are not supported.
- Press the “Select Folder” button. A new watched folder will then be added.
Once you have added a new watched folder from the Settings screen, the Home screen will be updated automatically. This allows you to switch to the auto-generated Watched Folder screen.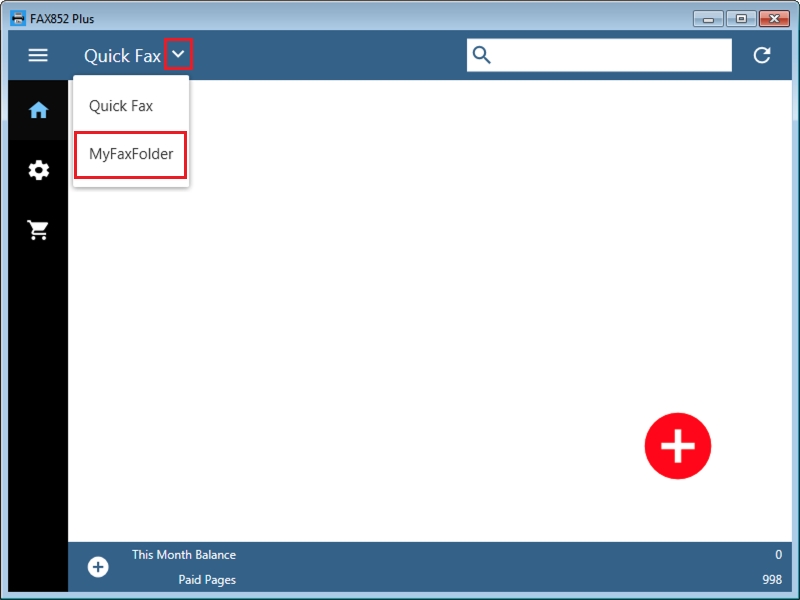 The Watched Folder screen will display the fax logs of the associated watched folder. Initially, since no fax job has been submitted and processed yet, no log will be displayed in the new Watched Folder screen.
Steps for removing a watched folder
- Click the Settings icon (i.e. gear icon) from the left menu panel of the Home screen.
- Under the “Watched Folder Faxing” section of the Settings screen, select the watched folder that you want to remove.
- Click the Minus icon to remove the selected watched folder.
How to Create and Submit a Fax Job
Once you have setup a watched folder, you can proceed to try creating a fax job and put it into the corresponding folder on your file system for processing. There are two methods that you can use to create a fax job:
- by putting a specially-named PDF file into a designated folder.
- by putting a fax job file and optional PDF files into a designated folder.
If you just need to send a PDF file without a cover sheet to a fax number, then putting a specially-named PDF file to a designated folder would probably be the simplest way. On the other hand, putting a fax job file and optional PDF files into a designated folder would give you more control and flexibility.
Create a fax job by putting a specially-named PDF file into a designated folder
You can prepare a specially-named PDF file according to the following steps:
- Make a copy of the PDF file that you want to send.
- Rename the copied file with this special filename syntax:
fax={+852xxxxxxxx}optional_text_part.pdf
- The filename must begin with fax= and end with .pdf.
- In the filename, the fax number must be surrounded by curly brackets {}.
- The fax number typically starts with +852, and then followed by xxxxxxxx which must be replaced with the value that matches the recipient fax number. If the prefix +852 is omitted, FAX852 Plus will prepend it to the fax number automatically.
- You can replace the optional_text_part with your desired text or simply leave it blank.
Example:
If you wanted to send a PDF file to fax number +85222223333, you might rename your copied PDF as fax={+85222223333}.pdf - Once you have renamed the copied PDF file, you can copy and paste it into your designated folder on your file system. The FAX852 Plus Service will convert that file into a fax job and try faxing it out via the FAX852 Cloud Service.
Create a fax job by putting a fax job file and optional PDF files into a designated folder
You can use any text editor to create a fax job file. The file extension of a fax job file must be “.efj”. The content of fax job file is in JSON format, so it is easy to read and edit. Once you have created the fax job file, you can put it together with the PDF documents to be sent into the designated folder on your file system for processing.
Below is a list of supported JSON elements that can be included within a fax job file:
root object
A fax job file must start with a single unnamed root object.
to array
The to array must contain at least one object. Each object contains the details of a specific fax recipient.
name item
The recipient name to be displayed in the To field on the cover page. (optional)
faxNumber item
The recipient’s fax number, which typically starts with the prefix +852. If the prefix +852 is omitted, FAX852 Plus will prepend it to the fax number automatically. (mandatory)
attachment array
The attachment array can contain one or more objects. Each object contains the details of a specific PDF document to be sent. (optional)
path item
The filename of the PDF document to be sent. It is case-insensitive. (mandatory inside an attachment object)
delete item
Control whether to delete the PDF document after processing the fax job, defaults to true. (optional)
coversheet item
The name of the cover page to be used, which must match with one of the FAX852 server-side cover page names, e.g. “0001.en”. (optional)
A cover page will be included if this item is set to a cover page name.
If this item does not exist or is set to blank, then no cover page will be included.
List of possible coversheet values:
| Regular Fax Cover Page | |
|---|---|
| 0001.en | English |
| 0001.zh-Hans | Simplified Chinese |
| 0001.zh-Hant | Traditional Chinese |
| Confidential Fax Cover Page | |
| 0002.en | English |
| 0002.zh-Hans | Simplified Chinese |
| 0002.zh-Hant | Traditional Chinese |
from item
The sender name to be displayed in the From field on the cover page. (optional)
subject item
Text to be placed in the Subject field on the cover page. (optional)
body item
Text to be placed in the Body field on the cover page. (optional)
You can use \n to insert a line break in the text.
result item
Control whether to generate a result file after processing the fax job, defaults to true (optional).
Let’s look at some examples to get a better understanding of the fax job file content.
Example 1:
Suppose you want to send a PDF document called “my_document.pdf” without a cover sheet to fax number “+85222223333”, you can create a fax job file (i.e. a .efj file) with content as shown below, and then copy the corresponding .efj file and my_document.pdf into a designated folder for processing.
Fax job file Content:
{
	"to": [
		{
			"faxNumber": "+85222223333"
		}
	],
	"attachment": [
		{
			"path": "my_document.pdf"
		}
	]
}
Example 2:
Suppose you want to send two PDF files (e.g. “my_document_1.pdf” and “my_document_2.pdf”) without a cover sheet to fax number “+85222223333”, you can create a fax job file (i.e. an .efj file) with content as shown below, and then copy the corresponding .efj file and the two PDF files into a designated folder for processing.
Fax job file Content:
{
	"to": [
		{
			"faxNumber": "+85222223333"
		}
	],
	"attachment": [
		{
			"path": "my_document_1.pdf"
		},
		{
			"path": "my_document_2.pdf"
		}
	]
}
Example 3:
Suppose you want to send a PDF file called “my_document.pdf” with a cover sheet to two recipients (“John Doe” and “Jane Doe” with fax numbers “+85222223333” and “+85222224444” respectively), you can create a fax job file (i.e. an .efj file) with content as shown below, and then copy the corresponding .efj file and my_document.pdf into a designated folder for processing.
Fax job file Content:
{
	"to": [
		{
			"name": "John Doe",
			"faxNumber": "+85222223333"
		},
		{
			"name": "Jane Doe",
			"faxNumber": "+85222224444"
		}
	],
	"attachment": [
		{
			"path": "my_document.pdf",
			"delete": true
		}
	],
	"coversheet": "0001.en",
	"from": "Acme Corporation",
	"subject": "This is a test fax",
	"body": "Hi,\nHope everything goes well.",
	"result": true
}
How to Monitor a Submitted Fax Job and Interpret a Result File
After you have added a new fax job into a designated watched folder, the FAX852 Plus Service will pick it up for processing. Once a new fax job in the watched folder has been picked up by the FAX852 Plus Service for processing, a new fax log will be generated in FAX852 Plus automatically. You can view the fax logs by switching to the associated Watched Folder screen. You can click the Refresh button to reload the Watched Folder screen screen to display any new changes.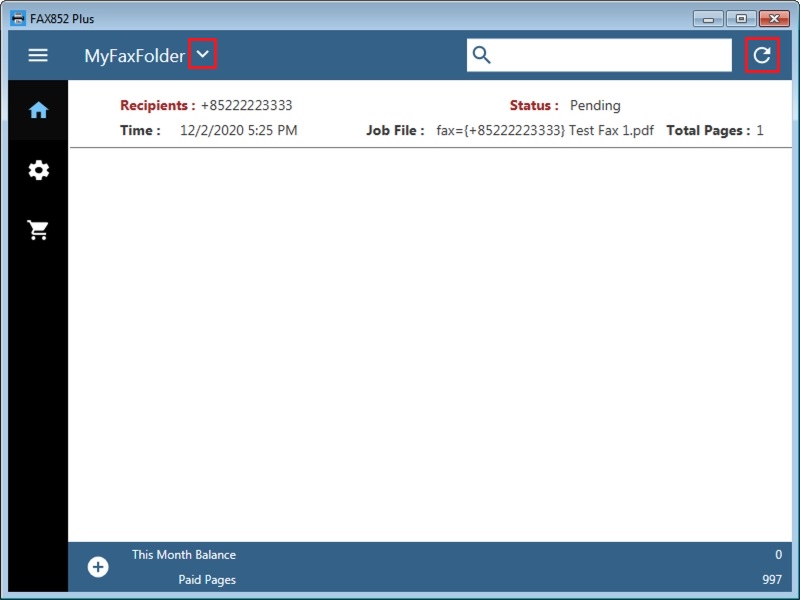
You can click on a particular fax log entry from the Watched Folder screen to see the corresponding fax details and download the fax transmission report.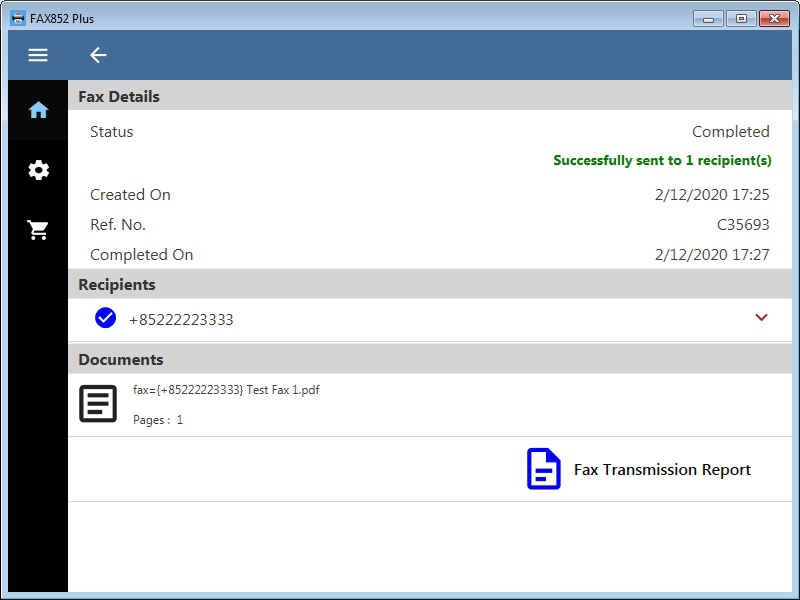
If your fax job was created by putting a specially-named PDF file into the designated folder, during processing the fax job, the FAX852 Plus Service will first rename the extension of the PDF file from .pdf to .PROCESSING. Once the processing has completed, the service will delete the .PROCESSING file and generate a .RESULT file. The .RESULT file is a plain text file in JSON format, which contains information about fax job processing and fax delivery results.
If your fax job was created by putting a fax job file and optional PDF files into the designated folder, during processing the fax job, the FAX852 Plus Service will first rename the extension of the fax job file from .efj file to .PROCESSING, while the PDF files will remain unchanged. Once the processing has completed, the service will delete the .PROCESSING file and generate a .RESULT file. The service will also delete the PDF files from the designated folder automatically by default.
The list of elements that may be included in a .RESULT file:
root object
A result file always starts with a single unnamed root object.
Start item
The start time of the fax job.
End item
The last updated time of the fax job.
RefNo item
The reference number of the fax job.
JobSubmissionError item
The error that occurred when preparing to submit the fax job.
Recipients array
The Recipients array contains one or more objects. Each object contains the fax details to a particular recipient.
To item
The name of the recipient.
FaxNumber item
The fax number of the recipient.
Status item
The final status of the fax transmission.
CompletedTime item
The completed time of the fax transmission.
CSID item
The Call Subscriber ID of the recipient.
Duration item
The duration of the fax transmission in seconds.
PagesSent item
The number of pages sent in the transmission.
Error item
The error that occurred during the fax transmission.
Example 1: A .RESULT file for a fax job that has a successful transmission.
{
	"Start":"2020-10-22T08:10:35.000Z",
	"End":"2020-10-22T08:13:57.000Z",
	"RefNo":"F58F4F",
	"JobSubmissionError":"",
	"Recipients":[
		{
			"To":"John Doe",
			"FaxNumber":"+85222223333",
			"Status":"SENT",
			"CompletedTime":"2020-10-22T08:11:16.000Z",
			"CSID":"",
			"Duration":1.0,
			"PagesSent":2,
			"Error":""
		}
	]
}
Example 2: A .RESULT file for a fax job that has a successful transmission and a failed transmission.
{
	"Start":"2020-10-22T08:10:35.000Z",
	"End":"2020-10-22T08:15:28.000Z",
	"RefNo":"F58F4F",
	"JobSubmissionError":"",
	"Recipients":[
		{
			"To":"John Doe",
			"FaxNumber":"+85222223333",
			"Status":"SENT",
			"CompletedTime":"2020-10-22T08:11:16.000Z",
			"CSID":"",
			"Duration":1.0,
			"PagesSent":2,
			"Error":""
		},
		{
			"To":"Jane Doe",
			"FaxNumber":"+85222224444",
			"Status":"ERROR",
			"CompletedTime":"2020-10-22T08:12:47.000Z",
			"CSID":"(852) 2222 4444",
			"Duration":1.0,
			"PagesSent":0,
			"Error":"Busy"
		}
	]
}
Example 3: A .RESULT file for a fax job that has a submission error.
{
	"Start":"2020-10-23T05:13:12.000Z",
	"End":"2020-10-23T05:13:12.000Z",
	"RefNo":null,
	"JobSubmissionError":"Invalid recipient fax number: '+8521234'.",
	"Recipients":null
}
How to Troubleshoot in Case of Encountering a Problem
Please see whether or not the following FAQs can help.
Question: When installing FAX852 Plus, I get an error “This application requires Microsoft Visual C++ Redistributable for Visual Studio 2015, 2017 and 2019”. What can I do?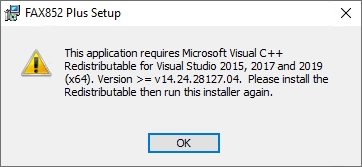
The “Microsoft Visual C++ Redistributable for Visual Studio 2015, 2017, 2019 and 2022” is a prerequisite for FAX852 Plus. Please download and install it before installing FAX852 Plus.
https://support.microsoft.com/en-us/help/2977003/the-latest-supported-visual-c-downloads
Question: I get an error “LoadWatchedFolder() : Status(StatusCode=Unavailable, Detail="failed to connect to all addresses")” after launching FAX852 Plus. What can I do?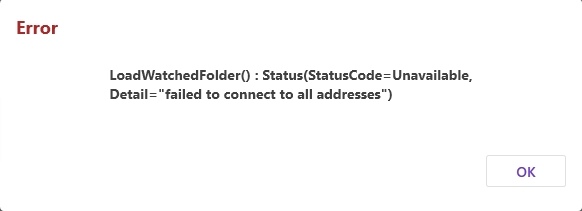
- Please check whether the FAX852 Plus Service is started:
- Launch the Windows Services application (press the Windows+R keys to open the Run dialog, type services.msc and then press Enter)
- Make sure “FAX852 Plus Service” is listed as one of the services.
- Make sure the “Startup Type” of the “FAX852 Plus Service” is set to “Automatic”.
- Make sure the “FAX852 Plus Service” is started. If it is stopped, try starting it.
- If the service fails to start, please try to download and install the “Microsoft Visual C++ Redistributable for Visual Studio 2015, 2017, 2019 and 2022”.
https://support.microsoft.com/en-us/help/2977003/the-latest-supported-visual-c-downloads
Question: I have put a new fax job into a designated folder on my file system, however, I cannot see any new fax jobs from the corresponding watched folder screen in FAX852 Plus, even though I have tried refreshing the screen for over 5 minutes. There is also no .PROCESSING file generated in the file system too. What can I do?
- Check whether the FAX852 Plus Service is started:
- Launch the Windows Services application (press the Windows+R keys to open the Run dialog, type services.msc and then press Enter)
- Make sure “FAX852 Plus Service” is listed as one of the services.
- Make sure the “Startup Type” of the “FAX852 Plus Service” is set to “Automatic”.
- Make sure the “FAX852 Plus Service” is started. If it is stopped, try starting it.
- Make sure you have already created a watched folder in FAX852 Plus for that particular folder on your file system. You can see the list of existing watched folders from the Settings screen of the FAX852 Plus.
Question: The status of my fax job has remained as “Pending” for over 5 minutes in the Watched Folder screen even though there is no other fax job being processed at the time. What is the problem?
Maybe your computer cannot access the Internet through HTTPS (port 443) for some reasons. Please check your Internet connection and make sure Web traffic is not blocked by a proxy server or firewall.
Question: I have already read all the FAQs above but the problem still cannot be resolved. What should I do?
Please feel free to contact us. If FAX852 Plus can be launched on your computer, you can click “Settings → Contact Us” from your FAX852 Plus, which will then launch your email client and create a new email with some information filled in by default. On the other hand, in case FAX852 Plus crashes and cannot be launched, you can send an email directly to us at support@fax852.com.
In your email, please provide additional information to describe the problem that you have encountered. We will reply to you as soon as possible.